by RSP Crew | Jan 10, 2025
A French drain isn’t one that plays “La Marseillaise” when you hit the flush button. But if you’re struggling with drainage in your yard, a French drain system might very well be the easiest and most beautiful solution.
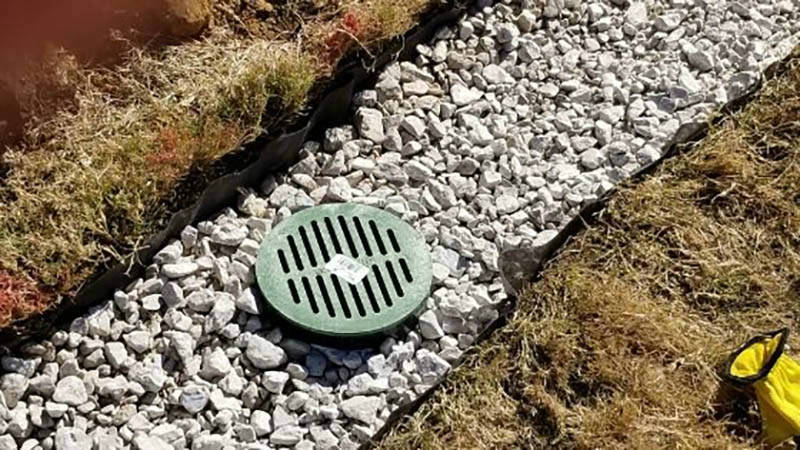
To look at a French drain you might just think it’s a pretty rock garden path – and that’s one of the best things about it. Better still is that it will solve your garden drainage problems, whether it’s ground and surface water that’s causing all the trouble. Best of all your home and structures foundations will be protected from erosion and flooding – and all with French drains that are easy to install, look good and actually work.
Definition and Purpose
A French drain is a type of drainage system designed to collect and redirect surface water and groundwater away from a specific area, such as a building foundation or a low-lying area of a yard. The primary purpose of a French drain is to prevent water accumulation and damage to structures, landscaping, and surrounding soil. By redirecting water away from the problem area, French drains help to maintain proper drainage, prevent soil erosion, and reduce the risk of water damage.
History and Development
The concept of the French drain dates back to the mid-19th century, when it was popularized by Henry Flagg French, an American lawyer and farmer. French drains were originally trenches filled with rocks or gravel that were used to divert water away from agricultural fields and buildings. Over time, the design of the French drain has evolved to include perforated pipes, which increase the volume of water that can flow through the system. Modern French drains are designed to be more efficient and effective, with a variety of materials and configurations available to suit different applications.
Types of French Drains
There are several types of French drains, each with its own unique characteristics and applications.
Surface French Drains
Surface French drains are shallow trenches that are used to collect surface water and redirect it away from a specific area. They are often used in areas with minor water accumulation issues and are typically installed in a shallow trench, usually 12-18 inches deep. Surface French drains are ideal for collecting water from roofs, sidewalks, and driveways.
Subsurface French Drains
Subsurface French drains are deeper and more effective for managing groundwater. They are commonly used around foundations and basements to prevent water seepage and damage. Subsurface French drains are typically installed in a deeper trench, usually 2-3 feet deep, and are designed to capture and redirect groundwater away from the problem area.
How Does a French Drain Work?
In a nutshell a simple but clever array of perforated pipe in sloping trenches with landscape fabric and decorative gravel or stone on top. Or if you like Henry Flagg French’s old school and innovative 19th century version you can get away with just a rock or gravel filled trench – although it will clog more easily than the modern version.
Benefits of French Drain Systems
French drains have many advantages for homeowners:
- Protect your foundations
- Permanent and low maintenance solution
- Looks good with seamless landscape integration
- Full versatility
- Easy & cheap to install
- Water redirection: French drains redirect excess water away from problem areas, preventing pooling or flooding
- Versatile: Can be installed anywhere, around foundations, in yards or along retaining walls
- Long term solution: With maintenance French drains will last for years
- Improves soil health: Reduces waterlogging, good for plant growth and lawn health
- Customisable: Can be designed to suit your property and style
French Drains vs Other Drainage Solutions
When considering drainage options you need to know how French drains compare to others:
1. Surface Drains:
- Pros: Visible, easy to maintain
- Cons: Ugly, tripping hazards
2. Sump Pumps:
- Pros: Good for basements, can handle lots of water, and can be installed under the basement floor to capture and redirect excess water
- Cons: Needs electricity, regular maintenance and can fail during power outages
3. Dry Wells:
- Pros: Good for areas with permeable soil
- Cons: Limited capacity, can get overwhelmed in heavy rain
4. French Drains:
- Pros: Looks good, good for large areas, passive
- Cons: Installation can be hard work, may need professional help for complex situations
French drains are often the best balance of effectiveness, looks and long term performance for many Australian properties.
How to Install a French Drain in 8 Easy Steps
While most plumbing & drainage work across Sydney and beyond will require the mandatory and skilled workmanship of fully-licensed Sydney plumbers and drainage specialists, installing a French drain is something you can do yourself. Here’s how:
Prepare
The most important thing to know before you start is what’s underneath that garden surface. Because hitting a pipe, electrical line or another underground cable, pipe or installation isn’t just going to mess up your and your neighbour’s place – it can be dangerous.
TIP: Try the Before You Dig Australia service at www.byda.com.au.
Follow the rules
Are you sure there aren’t any zoning or runoff regulations that will ruin your French drain party later on? Another thing to check off the list is whether your proposed drain configuration won’t cause drainage issues for your neighbour, because both of these will get you in hot and expensive water.
Find a slope
It’s a clever drainage innovation but a French drain is still very simple and only works if gravity is on your side. Remember, the whole idea is that water will seep into your laid pipes and be carried away because of the downhill gradient, so:
– Identify the drainage area
– Start at the top
– Route your downhill drainage path
– End the drain where you want the water to go
If your land is flat as a pancake you’ll need to create your own slope by digging shallowest at one end and deeper at the other end with at least a 1-2% grade.
Dig the trench
You’ll need it about 30cm wide and 50cm deep and make sure you don’t disturb the natural slope of the land with a poorly dug trench.
Line it
Your French drain will be lined with fabric – but it needs to be fully water-permeable. We recommend genuine landscape fabric which is designed for this purpose and is installed by:
– Rolling it out over the trench
– Leaving a 30cm gap on both sides
– Tamping down to fill the gaps
– Securing it in place
Add the gravel
Now pour a 5-10cm layer of gravel on top of the fabric.
Add the pipe
Any drain pipe will do but PVC will last the longest and work the best. It will need to have holes or perforations to do the drainage work and those holes should be laid face down and then the whole thing covered with another thin layer of gravel to within 5-10cm of the top of the trench.
Done
Fold the remaining fabric over the gravel and cover it all in soil. You can then finish off the look however you like – grass or just decorative stones.
French Drain Essentials
Get these before you start:
- Perforated pipe (PVC or corrugated)
- Landscape fabric
- Gravel or crushed stone
- Sand (for bedding)
- Topsoil (for finishing)
- Digging tools (shovel, pickaxe etc.)
- Level or laser level
- Tape measure
- Safety equipment (gloves, safety glasses)
Professional or DIY French Drain Installation
Deciding between professional installation and DIY depends on:
Professional Installation:
– Pros: Expertise in design and local regulations, proper equipment, warranty on work
– Cons: Higher upfront cost
DIY Installation:
– Pros: Cost savings, personal satisfaction
– Cons: Risk of errors, time consuming, may not have proper tools
Consider professional installation for complex projects, areas with utilities or if you’re not sure of local regulations. DIY is suitable for simple, straightforward installations in open areas.
French Drain Costs
Costs will vary depending on:
- Length of drain
- Depth of installation
- Soil type and excavation difficulty
- Materials used (e.g. type of pipe, gravel quality)
- Professional or DIY
In Australia professional installation can cost between $100 to $250 per linear metre. DIY will save you money but will take time and effort.
Regulations and Permits for French Drain
- Council Approval: Check if you need approval from your local council.
- Stormwater: Make sure your drain complies with local stormwater regulations, including proper connection to a storm drain.
- Property Boundaries: Check your drain doesn’t impact neighboring properties.
- Environmental: Some areas may have restrictions due to environmental concerns.
- Utilities: Always check for underground utilities before you dig.
Contact your local council or a licensed plumber for more information in your area.
French Drain Maintenance
Maintenance will keep your French drain working for years to come:
- Check-up: Inspect for clogging or damage at least twice a year.
- Debris removal: Clear leaves, twigs etc. from the surface of the drain.
- Flushing: Flush the system with water every now and then to clear sediment.
- Landscape maintenance: Trim nearby plants to prevent roots from entering the drain.
- Grate cleaning: If your drain has a grate, clean it regularly to allow water to flow.
- Professional check-up: Consider having a professional check the system every few years.
French Drain Problems
Even well installed French drains can have issues. Here are common problems and fixes:
- Clogging: If water isn’t draining, the pipe may be clogged. Flush the system or use a plumber’s snake to clear blockages.
- Surface water pooling: This could mean the drain is overwhelmed or not sloped correctly. Add more drainage or adjust the slope.
- Erosion around the drain: Add more gravel or adjust landscaping to prevent soil erosion.
- Foul odours: This means standing water or organic matter buildup. Flush the system and check the slope.
- Frost heave: In cold climates make sure the drain is installed below the frost line to prevent damage from freezing.
Advanced French Drain Installation
For more complex drainage issues try:
- Dual pipe systems: A second pipe for extra drainage in heavy rainfall areas.
- Sump pump integration: A French drain with a sump pump for basements or areas below the water table.
- Geotextile wrapping: Wrap the entire drain in geotextile fabric for extra filtration.
- Cleanout ports: Install access points for maintenance and cleaning.
- Bioswale integration: French drains with bioswales for natural filtration.
Need help with your French drain?
Every time it rains and pours across Sydney we are all reminded about the importance of good, professional stormwater drainage solutions that protect your home, family, garden, investments – and sanity!
Blacktown, Engadine, Castle Hill, Casula and Penrith are some of the most flood prone areas according to NRMA but nowhere is immune. If you want to put your French drains in the best possible hands give Sydney’s friendliest drainage experts here at Rapid Service Plumbing a call.
by RSP Crew | Dec 5, 2024
Rinnai is the name you know for hot water in Australia and for good reason – it’s the brand you can rely on to keep that water hot! But even the most reliable systems can have problems. This guide combines real life experience with technical knowledge to help you troubleshoot and fix common Rinnai hot water issues.
Know Your Rinnai
Before we get into the issues, get to know your Rinnai gas heater. Get familiar with the control panel, temperature settings and any model specific features.
Additionally, checking the gas meter is crucial to ensure that the gas supply is reliable and safe for optimal performance.
Understanding Your Rinnai Hot Water System
Understanding your Rinnai hot water system is crucial for effective troubleshooting and maintenance. Rinnai hot water systems are designed to provide a continuous supply of hot water, ensuring comfort and convenience in your home. These systems come in various models, including gas and electric options, each tailored to meet different needs.
The system consists of several key components, including the water heater, gas supply, and power supply. The water heater is the core of the system, responsible for heating the water to the desired temperature. The gas supply ensures that the heater has the necessary fuel to operate, while the power supply provides the electricity needed for the system’s controls and safety features.
Familiarising yourself with these components and their functions can help you identify potential issues and perform basic troubleshooting. For instance, knowing where the gas valve is located and how to check if it’s fully open can save you time and effort when dealing with a no-hot-water situation. Similarly, understanding the role of the power supply can help you diagnose issues related to the system’s control panel or digital monitor.
By taking the time to understand your Rinnai hot water system, you can ensure that it operates efficiently and reliably, providing you with the hot water you need when you need it.
Rinnai Hot Water Issues and Solutions
1. No Hot Water
If your Rinnai isn’t producing hot water, check:
- Gas supply: Is the gas turned on? Are there any supply issues?
- Ignition: Look for Error Code 11, it’s an ignition problem.
- Temperature settings: Have the settings been changed accidentally?
Effective hot water system troubleshooting can help identify the root cause of the issue and restore hot water supply quickly.
2. Lukewarm Water
For not hot enough water:
- Check the thermostat settings.
- Check the gas valve is fully open.
- Heat exchanger or scaling due to hard water?
- Ensure that the flow of hot water to the hot taps is not restricted, as this can affect the overall water temperature.
in which case you’ll need a good hot water repair plumber.
3. System Turns Off Suddenly
Sudden shutdowns can be caused by:
- Overheating (Error Code 16)
- Ventilation issues (Error Code 10)
- Unspecified system faults (Errors 70, 71 & 72)
4. Water Leaks
Small water leaks are normal, but excessive leaking could mean:
- Faulty valves
- Loose fittings or connections
- Tank corrosion (in extreme cases)
How to Reset Your Rinnai Gas Heater: Model Specific Instructions
Resetting your Rinnai heater will often fix minor issues. Here’s how:
- Find the control panel on your Rinnai gas heater.
- Switch off the power to the unit.
- Wait 1-2 minutes.
- Switch the power back on.
- If your model has a reset button, press and hold for 3-5 seconds.
For model specific instructions:
- Rinnai Infinity models: Press the ‘On/Off’ button twice.
- Rinnai Deluxe models: Hold the ‘Priority’ button for 5 seconds, then press ‘On/Off’.
- Rinnai Portable Gas Heaters: Turn the control dial to ‘Off’, unplug the unit, wait 10 seconds, then plug it back in and turn on.
If these steps do not resolve the issue, it may be time to consider making a service call to a professional technician.
Rinnai Gas Heater Error Codes
Error codes will give you an idea of what’s wrong:
- Error 11: Ignition failure. Check gas supply and igniter.
- Error 12: Flame failure. Check gas pressure and clean flame rod.
- Error 14: Overheat. Let the unit cool and ensure proper ventilation.
- Error 16: Over temperature warning. Check blocked exhaust or air intake.
- Error 32: Outgoing water temperature sensor fault. May need professional help.
- Error 61: Combustion fan failure. Check for obstructions or call a technician.
Understanding these error codes is crucial for diagnosing issues with your Rinnai hot water heater and ensuring it operates efficiently.
You might even have a new electric hot water system model with a remote, which can be used – but bear in mind that most hot water temperature in Australia is restricted due to the scalding risk.
Pre-Reset Checklist
Before you reset your Rinnai heater do this:
- Check gas supply: Gas valve fully open.
- Check power supply: Heater properly plugged in or wired.
- Check water connections: Look for leaks or blockages.
- Check for error codes: Note any on the control panel.
- Listen for unusual noises: During operation.
- Recent changes: Any recent changes or weather events?
Ensure that the hot water taps press is functioning correctly to avoid any issues during the reset process.
Safety First: Precautions for Resetting Your Rinnai Gas Heater
Always safety first when dealing with gas appliances:
- Switch off the gas before any reset or maintenance.
- Make sure the area around the heater is well ventilated.
- Never reset a damaged or gas leaking heater.
- Wait for the unit to cool before touching any parts.
- Wear appropriate safety gear (gloves) when handling the unit.
- Keep flammable materials away from the heater.
Advanced Troubleshooting
Advanced troubleshooting involves a more in-depth analysis of your Rinnai hot water system to identify complex issues that may not be immediately apparent. This level of troubleshooting often requires specialised tools and expertise, and it’s recommended to seek the help of a professional plumber if you’re not comfortable with DIY troubleshooting.
Here are some advanced troubleshooting techniques to consider:
- Checking the Gas Supply: Ensure that the gas supply is sufficient and properly connected. This includes verifying that the gas valve is fully open and that there are no kinks or blockages in the gas lines.
- Inspecting the Power Supply: Make sure the power supply is functioning correctly. Check that the heater is properly plugged in or wired and that there are no issues with the electrical connections.
- Analysing Error Codes: Pay attention to the error codes displayed on the digital monitor. These codes can provide valuable insights into what might be wrong with your system. Refer to the error code guide in this article for specific troubleshooting steps.
- Checking the Inlet Water Filter: Ensure that the inlet water filter is clean and free of debris. A clogged filter can restrict water flow and affect the system’s performance.
- Inspecting the Heating Cycle: Observe the heating cycle to ensure it’s functioning correctly. This includes checking for any irregularities in the ignition process, flame stability, and water temperature regulation.
By performing these advanced troubleshooting steps, you can identify and address more complex issues with your Rinnai hot water system, ensuring it operates efficiently and reliably.
Repair and Replacement Options
If your Rinnai hot water system is not functioning correctly, you may need to consider repair or replacement options. Repairing your system can be a cost-effective solution, but it’s essential to ensure that the repair is done correctly to avoid further issues. Replacement options may be necessary if your system is old or damaged beyond repair.
Here are some factors to consider when deciding between repair and replacement:
- Age and Condition of Your System: Older systems may be more prone to breakdowns and less energy-efficient. If your system is over 10-15 years old, it might be time to consider a replacement.
- Cost of Repair vs. Replacement: Compare the cost of repairing your current system with the cost of a new one. If the repair costs are high and the system is old, replacement might be a more economical choice in the long run.
- Energy Efficiency and Performance: Newer models of Rinnai hot water systems are often more energy-efficient and offer better performance. Upgrading to a new system can result in lower energy bills and improved hot water delivery.
- Availability of Replacement Parts and Labor: Ensure that replacement parts for your current system are readily available. If parts are hard to find or expensive, it might be more practical to replace the system.
It’s recommended to consult a professional plumber to determine the best course of action for your Rinnai hot water system. They can assess your system and provide recommendations for repair or replacement, ensuring that your hot water needs are met efficiently and effectively.
Call a Pro
While many can be fixed at home, some need expert help. Call a licensed technician if:
- You smell gas or think you have a leak.
- The heater keeps shutting off or displaying error codes.
- There’s water leakage or damage to the unit.
- You hear unusual noises or see visible flame issues.
- You’re not comfortable doing maintenance or resets yourself.
- The unit hasn’t been serviced in over a year.
Maintenance: Minimise Resets
Maintenance will prevent many problems:
- Annual professional service.
- Clean or replace air filters as per manufacturer’s instructions.
- Keep the area around the heater clean and clear of debris.
- Check and clean exhaust vent periodically.
- Check water hardness and consider a water softener if needed.
- Inspect visible pipes and connections for wear and corrosion.
Resetting Rinnai Gas Heaters
Portable
- Switch off and unplug the unit.
- Wait 10 minutes for the unit to cool.
- Check and clean air filter if needed.
- Plug back in and switch on.
Continuous Flow
- Switch off at the switchboard.
- Wait 5 minutes.
- Switch back on.
- Press the ‘On’ button on the temperature controller.
Storage Tank
- Find the reset button (usually near the thermostat).
- Press and hold for 3-5 seconds.
- If still not working, switch off power and gas, wait 30 minutes, then switch back on and try again.
FAQs: Rinnai Gas Heater Reset
How often should I need to reset my Rinnai gas heater?
Rarely. If you need to reset frequently there’s an underlying issue that needs professional attention.
Will a reset clear all error codes?
No. Some error codes will remain after a reset and need further action.
Can I reset my Rinnai heater if it’s still hot?
It’s best to wait until the unit has cooled before attempting a reset for safety.
Will a reset void my warranty?
Standard resets shouldn’t affect your warranty but check your warranty terms for conditions.
Why did my Rinnai gas hot water system just suddenly turn off?
The main cause of a sudden but apparently-routine shutdown of your Rinnai gas hot water system is overheating – so you might be seeing Error Code 16.
Gas Supply Troubleshooting
If you think you have gas supply issues:
- Check the main gas valve is fully open.
- Check there are no kinks in the gas lines.
- Listen for gas flow when a hot water tap is turned on.
- Check other gas appliances to see if they’re getting gas to the property.
- If you think you have a gas leak, switch off the supply and call your gas provider.
Additionally, ensure that the hot tap is functioning correctly to maintain a continuous flow of hot water.
The Priority Button
The Priority button is useful for managing hot water in different areas of your home:
- It sets the water temperature for that controller.
- Only one controller can have priority at a time.
- To change priority turn off all hot water taps and press the Priority button on the desired controller.
- The Priority indicator will light up on the active controller.
- Use this feature to manage hot water temperature in different areas of your home.
Conclusion
Your Rinnai hot water system is designed to provide years of reliable service. By understanding common issues, knowing how to perform basic troubleshooting, and maintaining your system properly, you can ensure optimal performance and longevity. Remember, when in doubt, it’s always best to consult with a professional plumber or technician.
For expert help with your Rinnai hot water system in Sydney, don’t hesitate to contact Rapid Service Plumbing. Our team of friendly plumbers are available 24/7, offering fast, affordable solutions backed by a lifetime workmanship guarantee.
by RSP Crew | Dec 2, 2024
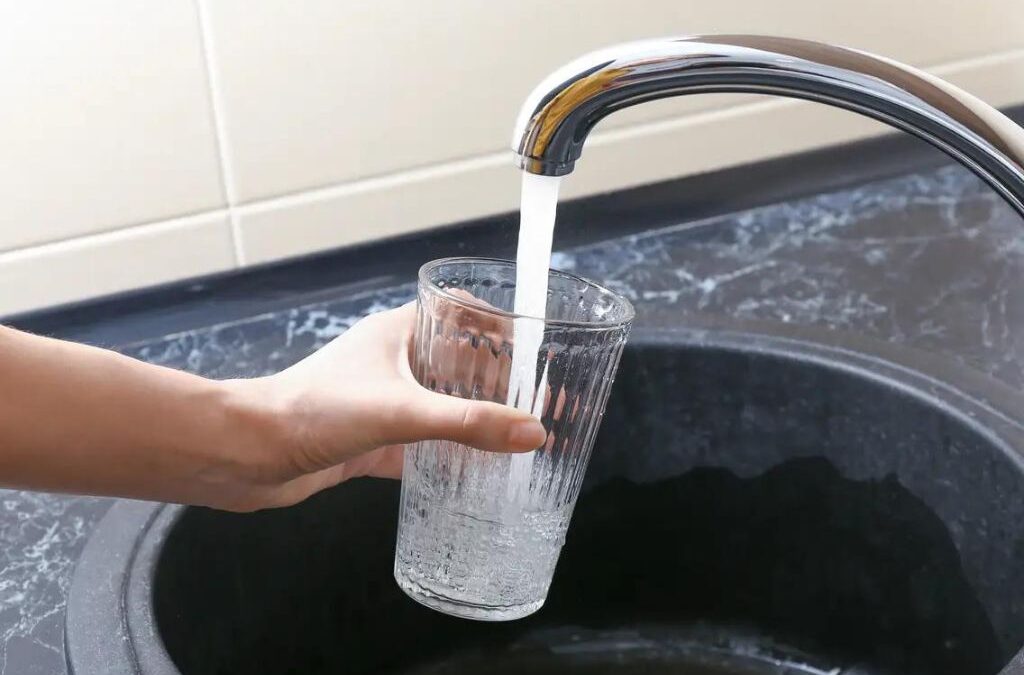
How many times have you been told that Sydney tap water is “perfectly safe to drink?” If your answer is “quite a lot,” consider this: the word “perfectly” is a pretty strong one! Because while you’re certainly not going to keel over with your next sip of water from the tap, there’s not really any doubt that you can taste chlorine, is there? So today we’re going to probe a critical question: Is Sydney tap water safe to drink?
First, the good news. All of the tap water supplied to homes in this country is subject to the Australian Drinking Water Guidelines, which concerns itself with just how much fiddling with your tap water the authorities can do. These guidelines include specific guideline values for acceptable concentrations of various substances, established based on health risk assessments. The fine print is that the guidelines are in fact “not mandatory,” even though Sydney Water – the statutory supplier of Sydney drinking water – reassures us that the filtering it does is in compliance with the guidelines, making it safe to drink straight from the tap.
Is it safe to drink tap water in Sydney?
The global water advisory authority tapsafe.org, meanwhile, doesn’t quite go along with the ‘perfectly safe’ narrative and tells us that Sydney tap water is actually “generally safe to drink.” And while our water is certainly as good as the safest tap water in the world, the same organisation admits that there’s no guarantee it doesn’t contain “a number of pollutants and contaminants.” Sydney Water, on the other hand, tells us it tests Sydney tap water quality in laboratories for “70 different characteristics” – taste, smell, colour, chemicals and microorganisms. Among those contaminants are ‘forever chemicals’, known for their persistence in the environment and resistance to breaking down. The water analysis is done all the way from the sources, like lakes and rivers, all the way to your tap – and according to NSW Health, “there is no such thing as naturally pure water.” That’s true. In those rivers and dams and other water sources, NSW Health says Sydney’s water “dissolves or absorbs a range of substances” – most of which are “harmless.” Even so, the fact that some of them may not be perfectly harmless is precisely why Sydney tap water is chlorinated before it gets into your glass in the kitchen.
Sydney Water Treatment Processes
Sydney’s water treatment involves several stages to ensure safety and quality. Filtration plants play a big role in this process, particularly in addressing the presence of PFAS chemicals in water sources. The process includes screening to remove solid objects, flocculation to clump fine particles, filtration through sand or anthracite, and disinfection using chlorine and ammonia. Fluoride is also added to promote dental health. The Cascade water filtration plant is a significant location for PFAS chemical testing results, with high levels found there compared to other filtration plants. The Kurnell desalination plant supplements the water supply when dam levels are low, using reverse osmosis to extract freshwater from saltwater.
Is Sydney Water Hard or Soft?
Sydney’s water is generally “soft”, meaning low concentrations of calcium and magnesium ions. This is because of the city’s reliance on surface water sources like dams and reservoirs, and the treatment processes used by Sydney Water. Soft water is gentle on skin, hair and household appliances, and reduces scale build-up in kettles and hot water systems. The exact hardness may vary slightly across suburbs, but Sydney’s water is generally soft.
Regular Testing and MonitoringWaterNSW monitors both surface and groundwater sources, tracking physical, chemical, biological, radiological, hydrological and meteorological parameters. This ensures any issues are detected early and addressed quickly. The results are reported in annual and quarterly reports.
Forever Chemicals (PFAS/PFOS) in Sydney Tap Water
PFAS (per- and polyfluoroalkyl substances), sometimes called “forever chemicals”, are synthetic compounds that persist in the environment. One of the primary substances of concern is perfluorooctanoic acid (PFOA). WaterNSW conducts targeted, risk-based investigations and rigorous testing for PFAS across the Greater Sydney catchment and dams, following strict sampling and laboratory protocols. WaterNSW is highly regulated and adheres to the highest standards to manage any risks from PFAS. Current monitoring shows Sydney’s water supply is compliant with safety standards, but ongoing testing and regulatory oversight will continue as science and technology evolves.
Microplastics and New Contaminants
Recent studies have found microplastics in wastewater in the greater Sydney region, with levels varying depending on treatment processes. Wastewater treatment plants are being monitored for microplastic content and research is ongoing to assess the effectiveness of removal and the impact on drinking water supplies. While the risk to human health is still being studied, Sydney Water and regulatory agencies are monitoring for these and other emerging contaminants and adapting treatment processes as needed.
Australian Drinking Water Guidelines
When it comes to ensuring the safety and quality of our drinking water, the Australian Drinking Water Guidelines (ADWG) are the benchmark. Developed by the National Health and Medical Research Council (NHMRC) and the Natural Resource Management Ministerial Council, these guidelines provide a comprehensive framework for managing drinking water quality across Australia.
The ADWG is based on the latest scientific research and is reviewed regularly to stay current and effective. These guidelines set out acceptable levels for various water quality parameters – pH, turbidity, bacteria – and provide detailed guidance on treatment processes to remove contaminants from drinking water and monitoring requirements to ensure ongoing safety.
In short, the ADWG covers everything from acceptable levels of different substances in our water to best practice treatment and monitoring. This thorough approach means the drinking water flowing from our taps is safe and of high quality, giving us all peace of mind.
Chemicals in Sydney Tap Water
Water has disinfectants like chlorine and chloramine to kill pathogens. Public health warnings often highlight the presence of blue green algae, or cyanobacteria, which can affect water safety especially during flooding and advise to boil water as a precaution in affected areas. Boiling water is a critical precaution during incidents that compromise drinking water quality to ensure safety from pathogens and contaminants. Fluoride is added for dental health. Trace amounts of heavy metals like lead, copper, cadmium and arsenic can also be present due to old plumbing systems. While these are generally within safe limits, home filtration systems can further reduce their presence.
Why Does Sydney Water Taste Like Chlorine?
Chlorine is added to Sydney’s water to keep it safe from bacteria and viruses as it travels through the distribution system. While necessary for public health, this can result in a taste or smell if you’re sensitive to it. Running your tap for a short time or using a filter can help reduce chlorine taste.
Where does Sydney get its water from?
Rainwater in five catchment areas of Sydney (Warragamba, Shoalhaven, Upper Nepean, Woronora and Blue Mountains) flows into many creeks and rivers that supply 11 major dams. The combined capacity is 2.6 million megalitres! More than 80% of Sydney’s water comes from natural sources, mainly the massive Warragamba Dam and is treated at the Prospect water filtration plant which meets the standards set by the Australian Drinking Water Guidelines.
Sydney’s drinking water comes from five main catchment areas: Warragamba, Shoalhaven, Upper Nepean, Woronora, and the Blue Mountains. Rainwater flows into creeks and rivers, supplying 11 major dams. Over 80% of Sydney’s water is sourced from Warragamba Dam and treated at the Prospect Water Filtration Plant before distribution. When dam levels are low, the Kurnell desalination plant supplements supply using reverse osmosis.
Incidents and Warnings
Even with the robust framework provided by the Australian Drinking Water Guidelines, incidents affecting drinking water quality can still occur. Natural events and accidents can introduce contaminants into our water supply and we need to act quickly to protect public health.
PFAS chemicals, also known as ‘forever chemicals’, fail to break down in the environment, highlighting their persistence and potential risks. These chemicals can remain in various products and the environment for an extended period without decomposing, raising concerns about their impact on health and safety.
For example, flooding can wash contaminants into water sources, algal blooms can produce toxins that affect water quality and chemical spills can introduce harmful substances into our drinking water.
When this happens, authorities issue warnings and take action to protect public health. This may include boil water advisories where residents are advised to boil their water before drinking to kill any harmful microorganisms. In more severe cases, authorities may issue “do not drink” advisories or provide alternative water supplies to affected areas.
Please heed these warnings and follow the advice of the relevant authorities to ensure your drinking water is safe. Stay informed and take precautions to protect yourself and your family from potential health risks.
What to Do If a Water Warning Is Issued
Sometimes natural events like flooding or algal blooms or incidents like chemical spills can affect water quality. When this happens, authorities may issue boil water advisories or “do not drink” warnings.
If you receive a warning:
- Follow all official advice immediately.
- Boil water before drinking, cooking or brushing teeth if advised.
- Use bottled or alternative water sources if a “do not drink” warning is issued.
- Even low levels of contaminants can be a concern and should be addressed by following official advice.
- Stay updated via your local council, water utility or NSW Health.
Environmental and Health Benefits
Drinking tap water instead of bottled water reduces plastic waste and energy consumption associated with production and transportation. Fluoride in water helps prevent tooth decay, contributes to dental health. Tap water is cost effective, promotes dental health due to fluoride content and is subject to strict quality controls that often exceed those for bottled water.
Tap Water and Your Appliances Sydney’s soft water is gentle on appliances, reducing scale build-up in kettles, dishwashers and hot water systems. This can extend the life of your appliances and reduce maintenance needs. However if you notice residue or build-up it may be due to other factors like sediment or plumbing materials not water hardness.
Discoloured or Odd Tasting Water
Discolouration is usually caused by sediment being stirred up by changes in water flow or pressure. Running a garden tap for a few minutes can clear this. If discolouration persists contact local authorities for assistance. For unusual tastes or odours consider using a home filtration system to improve water quality. Using filtered water can eliminate traces of contaminants and provide safer and better tasting water especially in areas with water quality issues.
Should You Filter Sydney Tap Water?
While Sydney’s water is safe, home filtration can give you extra peace of mind. Filters can:
- Remove chlorine and improve taste.
- Reduce trace metals from old plumbing.
- Lower the presence of microplastics or PFAS (depending on filter type).
- Provide an extra layer of protection for vulnerable populations.
Monitoring and managing PFAS levels in drinking water is crucial, and local water utilities play a key role in ensuring transparency by making testing results available on their websites.
Reverse osmosis and activated carbon filters are popular choices for comprehensive filtration. Consider your household’s needs, plumbing age and taste preferences before choosing a system.
Thinking about Water Filter Installation?
Heard enough? Sure, you could go your whole life drinking tap water Sydney wide and never have a problem – but on the other hand you could play it safe by filtering tap water to remove contaminants and improve taste and order the best water filter installation known to man! In Australia that just so happens to be reverse osmosis water filter technology – and here are 4 reasons to get one fitted asap:
- No tap water is pure: Your water may look pure but isn’t necessarily. The pipes could be full of contaminants – a filter removes them at point-of-use.
- Save money: If you’re worried about contaminants and solved it by drinking bottled water, a filter will pay for itself quickly while reducing plastic waste.
- Bye-bye chlorine: Chlorine disinfects but isn’t designed for consumption! A filter removes chlorine before you drink it.
- Better taste: Say goodbye to chlorine or metallic tastes with a filter.
Why Some People Don’t Drink Tap Water
Despite Sydney’s high water quality some residents don’t drink tap water because:
- Chlorine taste or odour.
- Concerns about old pipes leaching metals.
- Worries about emerging contaminants like microplastics or PFAS.
- Concerns about synthetic chemicals like PFAS, which are used in various industrial and consumer products and are known for their persistence in the environment.
- Preference for bottled or filtered water for taste or perceived safety.
Education about water treatment and regular testing can help address these concerns.
Check Your Local Water Quality
Sydney Water publishes daily, quarterly and annual water quality reports which show testing results for various parameters including chlorine, heavy metals and microorganisms. You can find these reports on the Sydney Water website or ask for specific info about your suburb. For the most up to date info, contact your local water utility or check your water bill.
Acceptable contaminant concentrations in drinking water are measured in micrograms per litre (µg/L).
Resources and Contact Info
If you have concerns about your drinking water or want to learn more about the Australian Drinking Water Guidelines there are many resources to help you.
The National Health and Medical Research Council (NHMRC) website is a good place to start. It has info on the ADWG and other health related topics. The Australian Government Department of Health website also has useful info on drinking water quality and public health.
For specific info about your local water supply, your local water utility is the best source. They can tell you about the quality of your drinking water and any incidents that may affect it. You can find their contact info on your water bill or by contacting your local council.
Here are the contact numbers:
By using these resources you can stay informed about your drinking water and make sure it meets the Australian Drinking Water Guidelines.
Whether you live in older suburbs like Double Bay, Birchgrove and Lane Cove or newer estates of Greenacre, Wahroonga or Gymea Bay – old pipes to your house and contaminants are a real issue. If you’re concerned about your water, did you know Rapid Service Plumbing can get the latest water filter technology installed at your place this week? Don’t take any chances and call our friendly team of Sydney plumbers today.
by RSP Crew | Mar 21, 2024
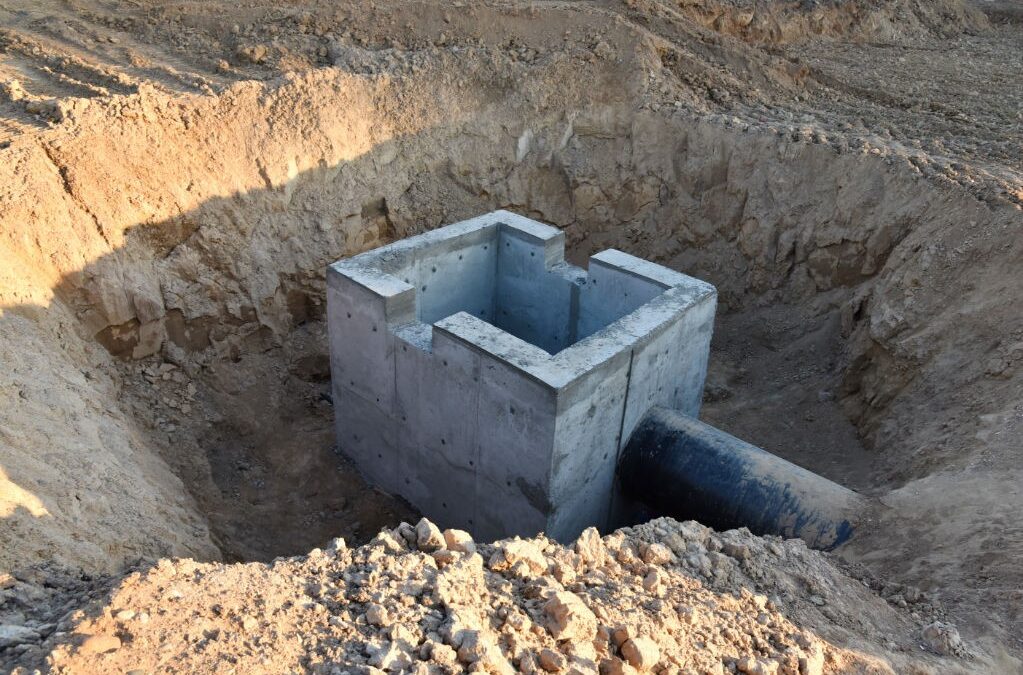
Ever thought about managing stormwater in your yard? A residential stormwater pit will protect your property from water damage and erosion. But where do you start with installing one yourself?
This guide will show you how to install a stormwater pit. We’ll cover where to put it, how to connect it to your drainage system and more. DIY stormwater pit installation can be complex and risky, requiring careful planning and execution to avoid issues like blockages and structural failures. We’ll talk about plastic pits and other types and give you the tools, tips and expert advice you need.
By the end of this guide you’ll know how to manage stormwater on your property. You’ll be ready to get started. Let’s get going and learn how to install a stormwater pit like a pro!
What are Stormwater Pits
Stormwater pits are essential for protecting your property from water damage and erosion. They manage excess water by directing it away from your home or business, contributing to effective drainage. This is done through a stormwater installation.
- Collecting and redirecting rain, storm and runoff water
- Preventing water from pooling around your foundation or in low lying areas
- Reducing the risk of soil erosion and landslides
- Protecting your landscaping and outdoor living spaces
As for how it works, it’s quite simple but it’s also quite ingenious: when it rains, the water flows into the pit through grates at the top, which filter out the debris. The collected water is then directed away from your property through connected drainage pipes, which should ideally lead to a stormwater drain system or safe discharge area. Think of it like this: the pit ensures that excess water is stored for a while so it can be gradually released, eliminating the risk of flooding and water damage to your landscaping and foundation making it an effective Sydney drainage solution. The only question that remains now is: how to install stormwater pit components at your place? Let’s take another dive:
Tip: The flooding in your yard might not actually require a stormwater pit. It’s possible water isn’t flowing due to partially blocked stormwater drains, so a professional drain inspection is advised before proceeding.
Water Damage and Erosion
A pit stops water damage and erosion. Without management stormwater can damage your foundation. It can also cause soil erosion and unstable ground and landslides.
Proper Drainage
A well designed stormwater pit drains water away. This saves you costly repairs and protects your investment in your home or business.
| Drainage Issue |
Potential Damage |
Stormwater Pit Solution |
| Pooling water around foundation |
Cracks, leaks, structural damage |
Redirects water away from foundation |
| Soil erosion |
Unstable ground, landslides |
Prevents soil erosion by managing water flow |
| Flooding in low-lying areas |
Damage to landscaping and outdoor spaces |
Collects and redirects excess water |
Local Regulations
You must follow local regulations and building codes when installing a stormwater pit. These rules ensure your stormwater installation is safe and doesn’t harm the environment or neighbours. Always check and follow the regulations in your area.
Types of Stormwater Pits
When you’re going to put in a stormwater pit or drain pit you need to know the types. Each type has its pros and cons. You need to choose the one that suits your needs and property.
Precast Concrete Pits
Precast concrete pits are a popular choice for many homeowners. They’re strong and durable. These pits are made elsewhere and come ready to install. Some benefits include:
- High load bearing capacity
- Corrosion and chemical resistant
- Long life
Plastic Stormwater Pits
Plastic stormwater pits are light and easy to install. They’re also corrosion and chemical resistant. But, they may not last as long as concrete pits and can’t hold as much weight.
Custom Built Pits
Custom built pits are made on site to fit your specific needs. They offer flexibility in size, shape and depth. You can choose from materials like concrete, brick or stone. But, they may cost more and take longer to install than precast or plastic pits.
The table below shows the main features of each stormwater pit type:
| Feature |
Precast Concrete |
Plastic |
Custom-Built |
| Durability |
High |
Medium |
High |
| Load-bearing capacity |
High |
Low to Medium |
High |
| Corrosion resistance |
High |
High |
Varies by material |
| Ease of installation |
Medium |
High |
Low |
| Cost |
Medium |
Low to Medium |
High |
Now that you know the types of stormwater pits and their features you can choose the right one for your drain pit or stormwater pit project.
Where to Install Your Stormwater Pit
When you’re installing a stormwater pit at home you need to choose the right spot. It will make your pit work well and easy to maintain. Look at your property’s drainage and find the lowest point to install your pit.
Consider this when choosing a spot for your stormwater pit:
- Natural drainage on your property
- Distance to your home’s downspouts and gutters
- Distance to the main stormwater system
- Accessibility for maintenance and cleaning
Choose a spot that’s easy to get to for maintenance. Don’t put it too close to your house to avoid water damage. Put it a few meters away, in a low area where water accumulates. Ensure that water flows smoothly into the stormwater pit to facilitate efficient drainage.
| Property Size |
Recommended Pit Capacity |
| Small (up to 500 m²) |
1,000 – 2,000 litres |
| Medium (500 – 1,000 m²) |
2,000 – 4,000 litres |
| Large (over 1,000 m²) |
4,000+ litres |
By choosing the right spot and size for your stormwater pit you’ll get the best results. Otherwise you’ll have drainage problems. If you’re not sure, it’s best to talk to a pro for advice.
Tools and Materials to Gather
Before you start installing your stormwater pit, gather all the tools and materials you need. Having everything ready will make the process easier and successful. Let’s see what you’ll need for your project.
- Shovel
- Tape measure
- Spirit level
- Stormwater pit
- Pipes and fittings
- Drainage pipes: Choosing the right drainage pipes is crucial for efficient water flow. Properly connecting these pipes ensures effective backyard drainage, preventing flooding. Pay attention to the gradient and flow direction to maintain optimal performance.
- Gravel
- Concrete mix
Excavation Tools
To install your plastic stormwater pit you’ll need the right tools. This includes:
- Shovels and spades for manual digging
- Excavator or backhoe for larger projects
- Safety gear, hard hats, gloves and steel toed boots
Make sure you have the right tools for your project size.
Pipes and Fittings
Pipes and fittings are the backbone of your stormwater pit system. When choosing consider:
- PVC or HDPE pipes for durability and ease of installation
- Elbows, tees and couplings to connect pipes
- Grates and covers to protect the pit and prevent debris from entering
Choose high quality pipes and fittings that meet local regulations and your plastic stormwater pit.
Backfill
After you’ve installed your stormwater pit you’ll need to backfill. You can use:
- Gravel or crushed stone for drainage and stability
- Sand for levelling and supporting pipes
- Soil to fill in the remaining space and promote plant growth
Choose backfill that allows for drainage and will support your stormwater pit for the long term.
Now you have all the tools and materials you need to start your stormwater pit installation. Always check local regulations and guidelines to make sure your plastic stormwater pit meets the requirements.
How to Install a Stormwater Pit
Installing a stormwater pit can be daunting for homeowners. But with the right tools and this guide you can do it yourself. Follow this to make sure it works and keeps your property water damage free.
Pipes and Fittings
Ensuring efficient water flow is crucial for the proper functioning of your stormwater system. Make sure to install pipes at precise angles and regularly clean the stormwater pits to prevent blockages.
Digging the Area
Mark the spot for your stormwater pit. Use a shovel or excavator to dig a hole slightly bigger than the pit. The depth will depend on local regulations and your drainage system.
Base Preparation
After digging, create a solid base for your pit. Compact the soil at the bottom and add gravel or crushed stone. This will prevent settling and allow for drainage.
Installing the Pit
Now put the stormwater pit in the hole. Make sure it’s level and fits the ground. Check precast pits for damage and follow the manufacturer’s guide for plastic or custom pits.
Pipes and Fittings
Now connect the pipes and fittings. Use the table below for common connections:
| Connection |
Purpose |
Materials |
| Inlet |
Directs water into the pit |
PVC pipes, adapters |
| Outlet |
Allows water to exit the pit |
PVC pipes, grates |
| Overflow |
Prevents flooding during heavy rain |
PVC pipes, pop-up emitters |
Make sure all connections are tight and leak free. After installing fill the area around the pit with soil and compact it to secure it.
Drainage Connections
When you install a stormwater pit, getting the drainage connections right is crucial. Connecting it to downspouts and the main stormwater system will collect water well. This will prevent water damage to your property. Stormwater drainage systems play a vital role in managing stormwater runoff and preventing flooding and water pollution.
First find the downspouts on your property that will go into the stormwater pit. These downspouts catch rainwater from your roof and keeps it away from your foundation. By connecting them to your stormwater pit you will manage water flow and prevent erosion or flooding.
Downspouts
Here’s how to connect your stormwater pit to downspouts:
- Measure the distance from the downspout to the stormwater pit to calculate the pipe length.
- Choose the right size and type of pipe according to local regulations and water volume.
- Dig a trench from the downspout to the stormwater pit, sloping it slightly for drainage.
- Put in the pipe, secure it with fittings and seals to prevent leaks.
Main Stormwater System
After connecting to downspouts, connect your stormwater pit to the main stormwater system. This will allow excess water to flow safely away from your property and into the municipal drainage network. Remember:
- Check with your local council or water authority for specific requirements and guidelines for stormwater pit connections.
- Find the main stormwater system and plan the connection route.
- Use pipes and fittings that meet local regulations and can handle the water flow.
- Make sure the connection is tight and sealed to prevent leaks or backflow.
By connecting your stormwater pit to downspouts and main stormwater system you will manage stormwater runoff well. Protect your property from water damage. Always check with local authorities and follow the rules for a compliant stormwater installation.
Stormwater Pit Maintenance
You need to keep your backyard stormwater pit in good condition. Regular maintenance will prevent costly repairs and keep your pit working well. Ensuring proper drainage into the stormwater pit efficiently will prevent blockages and promote optimal function. A few simple steps will make your pit last longer and protect your property from water damage and soil erosion.
Cleaning your stormwater pit regularly is key. Leaves, branches and dirt will fill up the pit over time and make it less effective. To clean it remove any visible debris and use a high pressure hose for smaller stuff. Clean your pit at least twice a year or more if you get a lot of rain or have many trees.
You should also check your stormwater pit for damage. Look for cracks, chips or any other damage that may weaken the pit. If you find any problems fix them as soon as possible before they get worse. Small repairs like sealing cracks you can do yourself. But bigger issues will need a pro.
Keep the area around your stormwater pit clean too. Make sure nothing is blocking the water flow, like too much grass or stored items. Also check that any pipes or drainage systems are clear and working properly to prevent blockages.
By looking after your residential stormwater pit it will protect your property for years to come. Cleaning, checking and maintenance will not only make your pit last longer but also give you peace of mind. Your home will be safe from water damage and soil erosion.
Installation Mistakes to Avoid
Installing a plastic stormwater pit or drainage pit requires attention. Knowing what to avoid will prevent problems. Choosing the right size pit is crucial to effectively manage excess rainwater and prevent property damage, flooding, and soil erosion. That’s your system will work for years to come.
Wrong Size
Choosing the wrong size is a common mistake. A pit that’s too small will overflow during heavy rain and damage. A pit that’s too big is a waste of money and won’t fit.
To get it right calculate the pit size based on the catchment area, rainfall and local regulations. Use sizing charts or get advice from experts to find the right size for your pit.
Not Compacted Enough
Not compacting the base and backfill enough is another mistake. This will cause the pit to settle and possibly collapse. This damage will affect the pit and the surrounding area.
To fix this:
- Excavate the area to the right depth and width
- Create a stable base with compacted gravel or crushed stone
- Install the pit and make sure it’s level
- Backfill around the pit in layers, compacting each layer
Not Thinking of Future Access
You need to think about maintenance and access when installing a drainage pit. Not planning for easy access will make maintenance hard or impossible.
To fix this:
- Place the pit in an easy to access location
- Install a removable grate or cover for quick access
- Don’t obstruct the pit with landscaping or structures
Thinking of access during installation will save you from future problems and costs.
| Mistake |
Consequence |
Prevention |
| Improper Sizing |
Overflow or unnecessary expense |
Calculate required capacity |
| Inadequate Compaction |
Settling and damage |
Compact base and backfill thoroughly |
| Failing to Consider Access |
Difficult maintenance |
Plan for easy access |
Avoid these and your plastic stormwater or drainage pit will work for years and manage stormwater runoff.
Stormwater Pit Installation: DIY or Professional Services
Homeowners wonder if they should install a stormwater pit themselves or hire a professional. Professional services for residential stormwater pit installation ensure proper techniques and stability, preventing landscape and foundation issues. The answer depends on your skills, experience and budget.
Your Skills and Experience
Before you start a DIY stormwater installation, check your capabilities. It involves digging, working with pipes and making sure drainage is right. If you’ve done similar projects before you might be okay with DIY.
But if you’re new to this, DIY can be risky. It can damage your property or cost more in the long run. In that case, get a professional is safer and more reliable.
Weighing the Costs
Cost is a big consideration when choosing DIY or professional services. DIY saves on labor but don’t forget to count the cost of tools and materials.
Hiring pros might seem expensive at first but they offer many advantages:
- They know how to install
- They have the right tools
- They work faster
- They stand by their work
Think of the long term benefits of a professional installation. A good drainage system will prevent damage and meet local regulations. It will save you money and stress later on.
Regulations and Permits for Stormwater Pit Installation
Before you start your stormwater pit project, check out local rules and permits. Following these will make your pit safe and legal. Ensuring that your stormwater pit work complies with local standards is crucial for preventing flooding and water damage.
Council Requirements
First contact your local council for their stormwater pit rules. Each council has their own set of rules. Get the exact details from them.
Some things you might need to do:
- Submit a detailed plan of your proposed installation
- Get a permit before you start work
- Sizing and placement guidelines
- Inspections at various stages of the installation
Building Codes
Your stormwater pit must also meet building codes and standards. These will make your installation safe and work with the area’s stormwater system. Consider:
- Approved materials and products
- Proper installation methods
- Enough capacity and flow rates
- Distance from structures and property lines
By following these you’ll ensure your stormwater pit is safe and will manage stormwater runoff on your property.
Stormwater Innovations
The world has big problems with urbanisation and climate change. New ideas in stormwater management is the key. They make stormwater pits work better and our planet. Innovative drainage solutions play a crucial role in managing stormwater effectively, preventing damage to landscaping and property foundations.
Permeable pavement is a game changer. It allows water to soak into the ground reducing runoff. You can use it on driveways, parking lots and more.
Green roofs are another cool idea. They’re covered in plants and absorb rainwater. This manages stormwater and makes buildings cooler.
Rainwater harvesting is getting popular too. It collects rainwater for irrigation and other uses. This helps drainage pits and saves water.
The table below shows the benefits of these new stormwater solutions:
| Solution |
Runoff Reduction |
Groundwater Recharge |
Additional Benefits |
| Permeable Pavement |
High |
Moderate |
Improved water quality |
| Green Roofs |
Moderate |
Low |
Energy efficiency, habitat creation |
| Rainwater Harvesting |
High |
Low |
Water conservation, cost savings |
Use these in your stormwater plan and you’ll see a big difference. It will make our cities greener and more sustainable.
The importance of correct drainage pit installation
Installing a backyard stormwater pit is a smart move for Australian homeowners. This guide will help you install a stormwater pit correctly. It will protect your property from water damage and erosion.
Choosing the right pit (like a plastic one) is important. Success comes from planning, using the right tools and paying attention to detail. Then your stormwater installation will work.
Always follow council and building codes for your pit. Keep your pit in good condition and your property will be safe for years to come.
Are you starting to get your head around the complexities of installing a stormwater pit? It requires understanding its function and all of the detailed steps that are involved – so why not get professional installation and expert advice done at a brilliant price? Here at Rapid Service Plumbing in Sydney, we’re your local go-to that Sydney residents really trust for a hassle-free and efficient installation, keeping your property safe and dry with a workmanship guarantee – for life! We are always ready to serve you whether you’re in Kingsgrove, Rosebery, Darling Point, Box Hill, Rozelle, Alfords Point, Beecroft, or beyond. Not only that, but we also now have a top rated Meblourne plumbing team available. So get in touch with Rapid Service Plumbing today for true peace of mind.
by RSP Crew | Mar 4, 2024
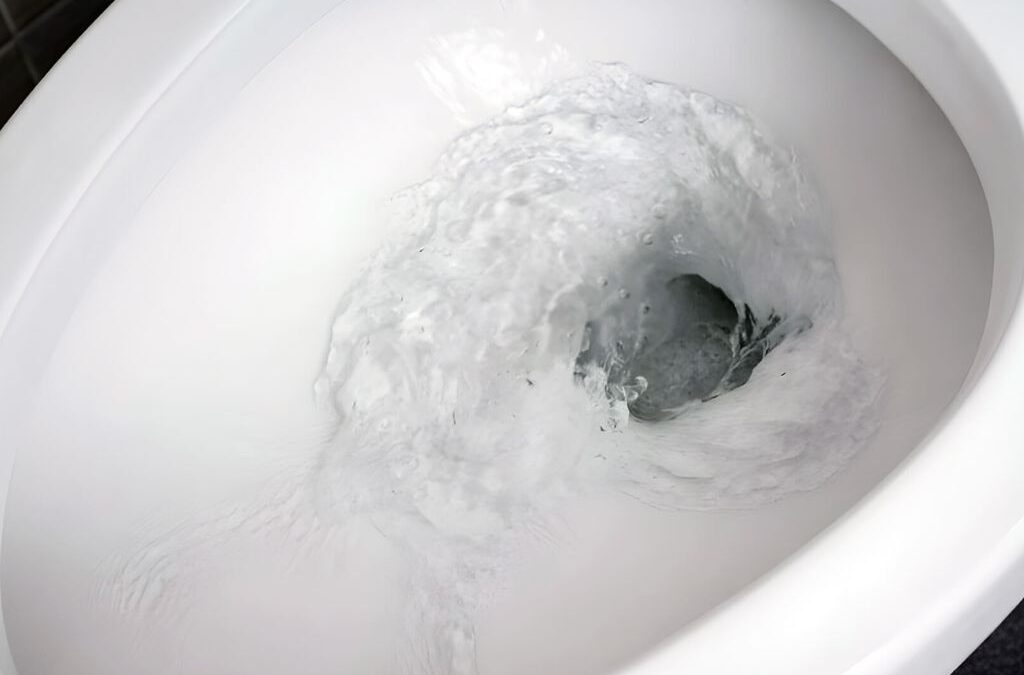
Ah, that dreaded moment when you hit the flush button, expecting everything to vanish in a whirlpool of triumph and science – and it simply doesn’t work out that way. Instead, you’re met with the stubborn refusal of that toilet paper (and its less mentionable companions) to bid a final farewell, leaving you in a flush of frustration and embarrassment. Toilet not flushing properly? Don’t fret, because you’ve stumbled upon the right spot – our ultimate troubleshooting guide is here.
Why is my toilet not flushing? First, don’t panic!
So how are we going to handle this? Well, as you can imagine, our Sydney toilet plumbers stare into a lot of misbehaving toilets and cisterns, so we can swiftly navigate you through the murky waters of a toilet not fully flushing. But before we get out our tools, the owners of these porcelain thrones ask us the questions. And right here and right now, we provide all of the answers for every flush faux pas!:
1. Why is the toilet paper not flushing?
Everything seems fine, but nothing really goes down, right? Often, if the toilet paper won’t flush (not to mention everything else!), it’s because you have a habit of using too much paper per flush, and it’s caused a blockage. You may even have been trying to flush non-flushables like feminine hygiene products, but the plunger could do the trick to fix it.
2. How come my toilet’s flush seems weaker than usual?
A weak flush can be due to low water levels in the tank. Open the cistern up – it’s not hard – and ensure the water level is about 2-3cm below the overflow tube. Check around the base and look for and water running into the bowl to ensure your cistern leaking is not the issue.
3. Why does my toilet not flush fully or empty the bowl completely?
Ah, that could be a problem with the flapper. It’s that rubber valve at the bottom of the tank, which lifts to release water into the bowl during a flush and then seals back up to refill it. If it can’t release enough water for a powerful flush, give it a once-over and check for wear or damage.
4. My toilet is flushing so slowly. What’s up?
Toilet not flushing fully – or just really, really slowly? Mineral build-up in the holes under the rim or in the siphon jet can be a reasonably simple explanation for a slowed-down flush. Get out an old toothbrush and some white vinegar and see what you can do.
5. My toilet keeps flush all by itself!?
In the plumbing business, we often call this ‘ghost flushing’ and the culprit can be the flapper once again, allowing water to seep into the bowl and trigger a full flush. You’ll need to check for leaks but that flapper probably needs replacing.
6. Why isn’t anything happening when I press for a flush?
Nothing happening at all when you press that button – literally nothing? It can seem like a catastrophic problem, but it could just be a loose or broken handle, and that’s always fixable by your local plumber in Sydney. Also, just check that handle is securely connected to the flush mechanism, as that can be a super-quick fix.
7. Why does my toilet gurgle when I flush it?
Oh, that could be a blocked vent pipe. You’ll need to call your plumber!
8. My toilet is brand new! Why isn’t it flushing properly?
Do you have one of those modern, low-flow toilets? Perhaps you’re simply not holding the handle down long enough to release enough water for a full, complete flush. You’re welcome! If only every problem was that easy to fix!
Toilet not flushing completely still? Call a Pro!
Have you scanned down the list of questions and your problem isn’t there? Or if you found your problem and the problem persists, what’s next? Look, it could be something quite a bit more serious like a total sewer line blockage or a toilet that needs hauling into the local tip – but don’t worry, because the guys at Rapid Service Plumbing are always just around the corner. No matter your toilet flush issue, we do it all – bundled with no-obligation quotes, upfront pricing, and 100% guaranteed workmanship for life. Give the friendliest team of local plumbers at Rapid Service Plumbing a call today.